Taking Your Gmail Signature to the
Next LEVEL!
Adding a signature to your outgoing emails is incredibly important in allowing others to view detailed contact information about you. It can be frustrating receiving an email from a recipient that doesn't have an email signature.
Have you ever received an email from another district employee and wonder:
- Who are they?
- What campus do they work at?
- What subject/course do they teach?
- If they have an alternate form of contact?
For this particular blog post, we are going to focus on creating an email signature in Gmail. So, how do I add a gmail signature? Well, here's a FREE google doc template that we send our district employees at the beginning of each school year. This email walks them through the process of creating a gmail signature, including our district minimum requirements in regards to what is needed in their signatures.
Here is a snippit of the email instructions:
To complete this task, go to your gmail account: gmail.google.com:
Go to SETTINGS (upper right hand corner of your email... icon looks like this: 
Click on that icon, and then select SEE ALL SETTINGS.
In Settings, click on the GENERAL TAB (this should be the default tab that you are on currently)
Scroll down until you see SIGNATURE
Click on the + CREATE NEW stating you want to create a new signature. You now have the option to create multiple email signatures. In the text box, create your digital signature. At least have the following:
Full Name (First and Last), Campus, Job Title/Position/Grade Level, and an Alternate way to contact you (ie: work phone, cell, email, social media info/handle etc.)
Make sure under the text box you click on the box that says, "insert this signature before quoted text in replies and....." Make sure you have a Check Mark in this box. ✅
When done, Continue scrolling down until you see: SAVE CHANGES. Click on SAVE CHANGES.
Now that our district employees know how to create their district signatures within gmail, we can start teaching them how to level up their signatures.
First, gmail recently had some big interface upgrades over the last few months. One of their biggest updates involved the ability to create multiple gmail signatures. Here's more information on that: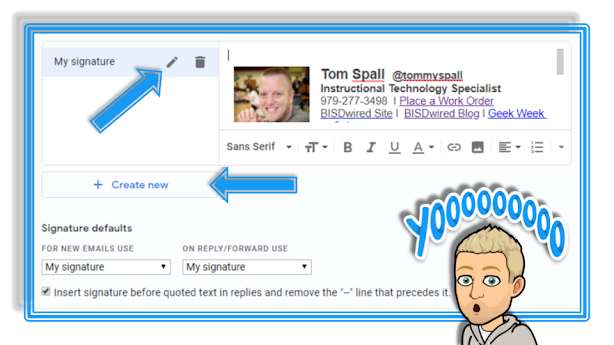
Create multiple email signatures via your Gmail Account. In each composed message, choose which email signature you would like to use.
Great for:
- Sending and/or replying to emails to either in-district or out-of-district recipients.
- Create various creative signatures for your team and/or campus.
- Have both an english/spanish version of your signature.
- ETC….
How do I set this up? Go to your settings in your gmail: (Click the gear dropdown, then click on settings).

Under the “General” tab (which is your default), scroll down until you see your email signature options. Create your new signatures! Have fun!
Taking Your Gmail Signature to the NEXT Level:
Now the fun begins! Let's get creative with your gmail signature!
I get asked all the time:
"How do you add a photo or Bitmoji to your gmail signature and still have it all aligned and clickable?"
The secret? I don't create my gmail signatures right in the gmail settings under the signature options. I create all of my gmail signatures in one Google Document. I use tables to structure my signatures, add my Bitmoji and/or headshot, and create "clickable" links to my calendar, website, and daily blog.
When I finish creating my signature I right-click, choose table properties, and make the border lines white. This will make it look like I never used a table to create my signature (This is how you do "Hidden Tables" for other templates, etc. I then copy my signature from my Google Document, and paste into my "Create a signature" option under my gmail settings. Save and viola!
Here's what my signatures look like from my Google Document prior to changing the boarder lines to white within the table properties settings:
Here's a quick GIF to show you how to add your Bitmoji to your gmail signature: - Create your Bitmoji at bitmoji.com and grabbing the phone app. Once this is completed, grab the Bitmoji Chrome Extension. Once signed-in and connected, click on the chrome extension and drag/drop your Bitmoji image into your signature table.


Comments
Post a Comment